Installing WordPress on hosting
Contents
- How to upload a website to hosting
- Option 1: Install WordPress directly from the panel
- Option 2: Manual installation of WordPress on hosting
- Conclusions
WordPress is considered one of the most popular CMS (content management system) because of the ease of configuration, open source and free distribution. It runs blogs, online stores, news portals and other resources. To ensure that the site with this engine will function properly, we recommend choosing a hosting, optimized specifically for WP.
Installing WordPress on hosting – easy procedure, it does not need to involve a specialist. In this article, we’ll look at different ways to install WordPress on the server and tell you step by step how to do and configure everything yourself.
How to upload a website to hosting
First of all, you need to download CMS from the official website and make sure that the chosen hosting meets the requirements of WP. There are several of them:
- RNR version – from 7.2;
- MariaDB database version from 10.0 or MySQL database version from 5.6;
- SSL certificate installed to work over the secure HTTPS protocol. .
How to install Wordpress on hosting? There are 2 basic loading options:
- Through the inside panel. A minimum of user action is required: specify the correct settings and administrator data. We recommend choosing this method for newcomers who are engaged in the launch of the site for the first time.
- Manual. You will have to do a little more work and have some knowledge and skills in installing the system.
Next, we’ll take a detailed look at both methods of how to get a WordPress site on hosting.
Option 1: Install WordPress directly from the panel
This is the easiest and most straightforward way to boot the system. We at Tuthost use the DirectAdmin panel. Compared to the well-known cPanel, it is more convenient, clearer and more reliable.
Step 1: Choose a tool
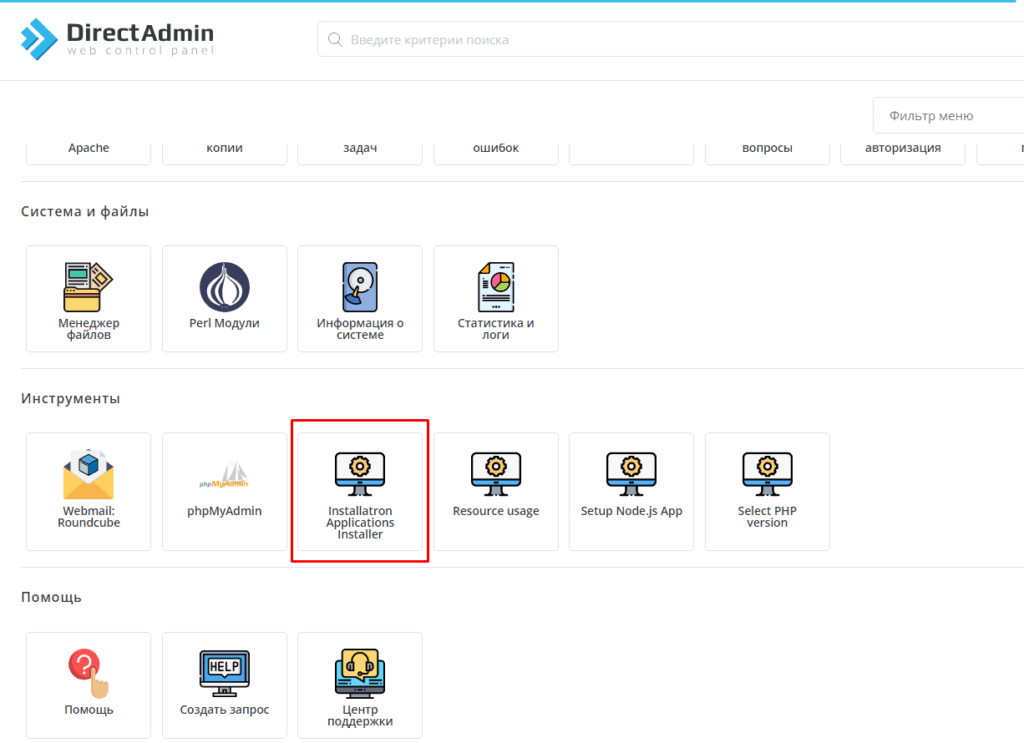
In the inner panel of DirectAdmin, scroll to the “Tools” section and select Installatron Applications Installer.
Step 2: General settings
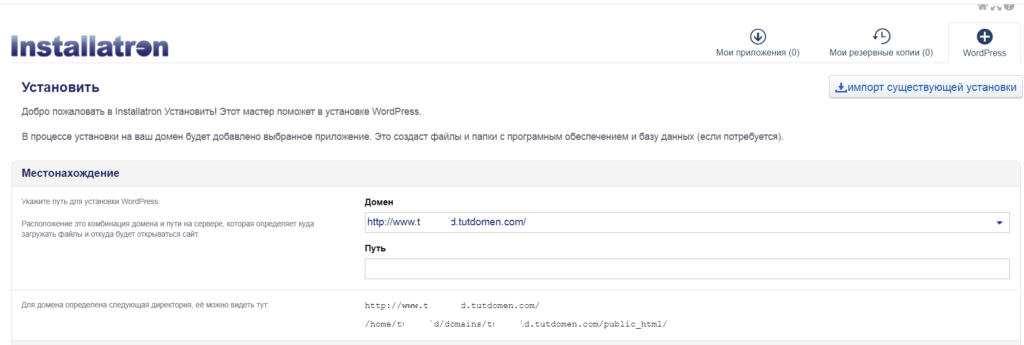
After proceeding to the installation wizard page, specify the path through which the files will be uploaded to the server. The site itself will open from there. The “Domain” field is already filled in, the directory is automatically generated according to the domain. If everything suits you, leave the “Path” item blank.
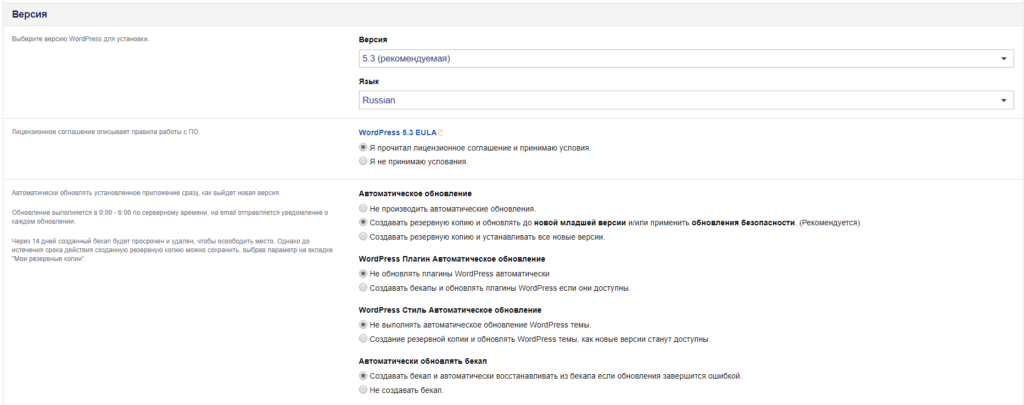
Under “Version” select the correct items. Beginners are better to act as shown in the screenshot: update the application to a new lower version with a backup, do not update plugins and themes, create a backup to recover from errors. You can change the settings later if you need to.
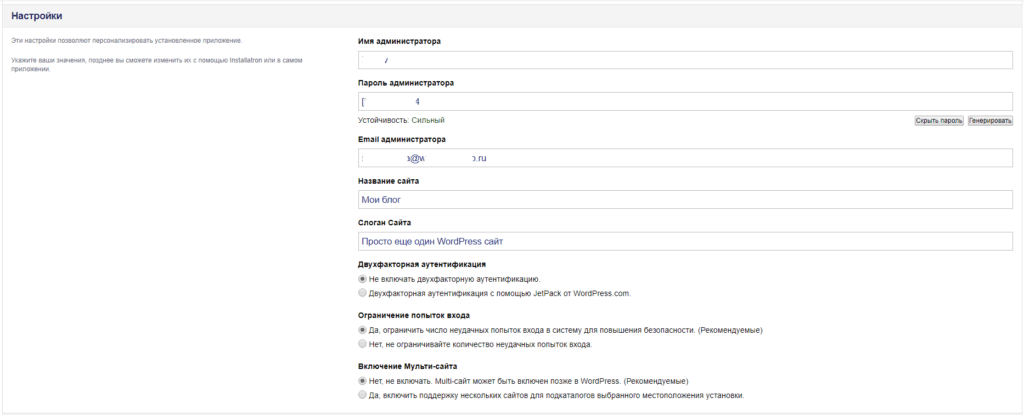
Personalize the system: enter your name, password and email, give the site a name and write a slogan. Think about whether you need two-factor authentication now. We recommend limiting the number of login attempts to reduce the risk of unauthorized access to the resource. The “Multi-site” feature is usually unnecessary at first.
All of these settings can be changed in the future.
Select whether you want the advanced settings to be controlled automatically or manually.
Step 3: Direct installation
Click the “Install” button and wait for the WordPress upload to hosting to complete. If you have done everything correctly, after a few seconds this window will appear:
This means that you have successfully transferred the content management system to Tuthost hosting and can begin to fill, edit and optimize the resource. The site itself and the admin panel are available from the links shown in the screenshot.
The advantage of this method is that you do not need to download anything beforehand, understand the coding or have basic sysadmin skills.
Option 2: Manual installation of WordPress on hosting
If you want to understand the process in detail, download the CMS manually. It’s a little longer, but still easy enough. The entire algorithm consists of 4 simple steps.
Step 1: Downloading the WordPress installation files
First go to the official website of the content management system and save the latest version. You will have a .zip archive on your computer, which you need to unzip. All the installation files are located in a folder called WordPress.
Step 2: Using an FTP client to download the WordPress installation files
Find the folder with the same name in the FTP-client and copy there all the files unpacked from the archive.
Step 3: Create a MySQL database
With each visitor’s visit, the content of the site is generated dynamically, the information is taken from the database. For everything to be displayed correctly, it must be created. Click on “Manage MySQL” in the panel, click on “Create Database” and specify a name and user.
Step 4: Start the installation of WordPress
All of the previous steps were preparations before directly installing the content management system on the hosting. After placing the installation files and creating the databases, open your domain name with a browser. Further algorithm:
- Select the language in which you want the content to be displayed, then press “Continue”.
- You will see a request for data about the base, etc., and then click on the “Go” button.
- A window will open in which you must enter the MySQL hostname and your data. You can see the name in the “Databases” section itself. Then select “Send”.
- CMS will check if there is a connection to MySQL. Click on “Run Installation” if no errors are detected.
- In the window that opens, fill in the fields with the name of the site and information about the administrator, continue the process by clicking on “Install WordPress”. You need to enter the following data: site name, username (meaning administrator), your password, email address. Pay attention to the “Visibility for search engines” feature. If it is enabled, your site will likely not be indexed by search engine crawlers. We recommend that you use it until you have fully prepared the resource for work.
Conclusions
Installing Wordpress – easy enough manipulation regardless of the method chosen, to understand the download and setup will be able to even a person engaged in the launch site for the first time. As for hosting, it is best to choose the one that is optimized for this engine. We at Tuthost have developed a separate pricing plan for installing WordPress on hosting, focused on WP users. On our hosting implemented caching Memcached to reduce the load and accelerate the site, it is possible to configure settings, modules, update templates, choose the version of PHP, and installation through the internal panel takes up to 5 minutes. Now you know how to upload a website to WordPress hosting and you can do it yourself.
Our rates:
| Rate plan | Cost per month, dollars | Cost if paid annually, dollars |
|---|---|---|
| Startup | 4 | 38,4 |
| About | 7 | 67,2 |
| Turbo | 10 | 96 |
Each of them provides a free domain if you rent hosting for a year or more.


