Installing an SSL certificate for the site
- How to install an SSL certificate for your website
- Creating and signing ssl certificate
- How to install an SSL certificate through ISPmanager
- How to install an SSl certificate on Apache
- Installing an SSL certificate on Nginx
- Installing an SSL certificate in Directadmin
- Verify that the SSL certificate is installed correctly
- Creating and signing ssl certificate
- How to install an SSL certificate through ISPmanager
- Install SSL certificate on Apache manually
- Installing an SSL certificate on Nginx
- Installing an SSL certificate in Directadmin
- Verify that the SSL certificate is installed correctly
How to install an SSL certificate for your website
A certificate is required to create a secure connection between the client and your site. When the certificate is properly installed, all data exchanged between your client and the website will be encrypted. How does the client know that the connection is secure? The address of your site will begin with https and next to it will be a closed padlock icon.
SSL certificates are issued by certification authorities such as Comodo (Sectigo), Symantec, GeoTrust, and others. Certificates of each can be used for a site on WordPress or any other engine.
You know the importance of using SSL, but how do you do it in practice? Follow our recommendations and you will be able to install your own SSL certificate!
What does it take to install a certificate:
- Key. When you create a CSR request necessarily generates a key, also called the private or secret key.
- Certificate. The ssl certificate file for your domain, and the certificates of the certificate authority from which you purchased the SSL certificate for your site.
- Serveraccess. The server that hosts your site, on which we will install the ssl certificate.
The procedure for installing the certificate does not depend on the used CMS and will be the same for the site on WordPress, Opencart and any other CMS. The only nuance that may arise is the need to enable the use of HTTPS in the settings of your CMS.
Creating and signing ssl certificate
To get an ssl certificate, you need to create a so called CSR certificate request. This can be done manually or through an order in your personal cabinet. Let’s look at both methods in order.
1) Create a query manually.
To create a CSR request we will use the OpenSSL utility, it is already available in your OS X and in most Linux. If you have Windows, use OpenSSL for Windows or Cygwin. Enter the command:
openssl req -nodes -newkey rsa:2048 -keyout vashdomen.key -out vashdomen.csr
When you see the prompt to specify a Common Name (FDQN), enter the name of your domain, without // and without www. When you fill in all the other data you will have two new files:
vashdomen.key – private key;
vashdomen.csr – CSR request.
The private key must be kept secret and must not be shared or emailed. A file with the *.csr extension must be sent to the ssl certificate provider.
2) Creating an order in your personal cabinet.
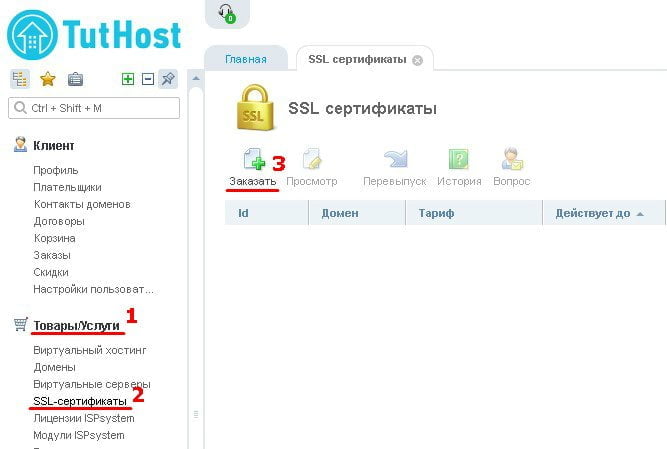
Now let’s look at how to create a CSR request through the order in the personal account on our hosting. Go to your personal account at my.tuthost.ua. If you are not yet registered with us as a client – you can do this by clicking on the linkRegister. So, we are in the personal cabinet. On the left side of the vertical menu, go to “Products/Services” – “SSL certificates” and click on the “Order” button.
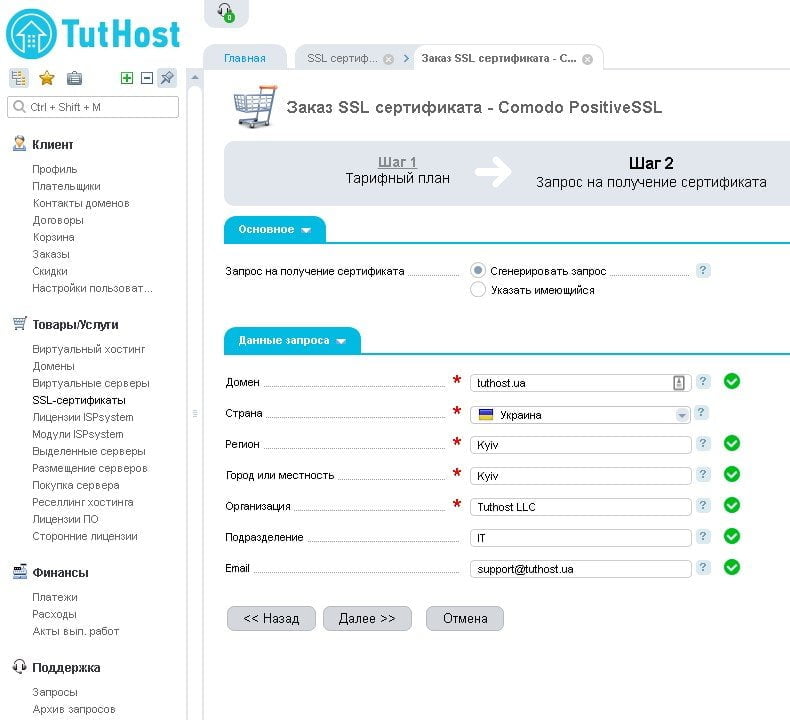
The first thing the system offers us is to fill out a Certificate Request by generating a new one, or to use an existing CSR request, if there is one. Select “Generate Request” and specify the name of the domain for which the certificate will be issued, the name of the organization, contact information and other necessary information.
Important! Check that the data is correct. There is no way to correct errors in the issued certificate. If a certificate is issued with an error, you can only re-issue it, create a new CSR request, a new key and reinstall the certificate.
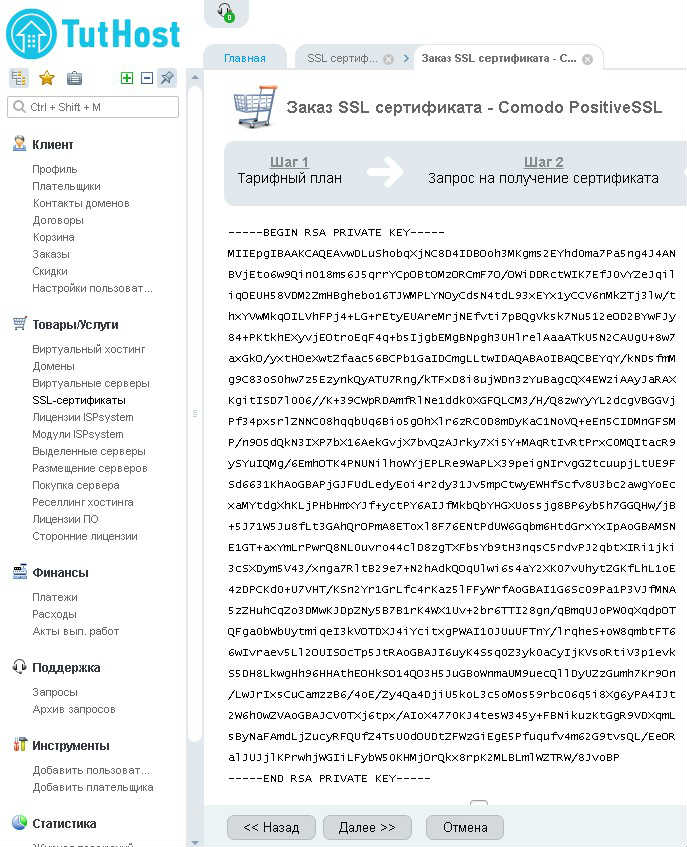
Click “Next” and get the secret key, which looks something like this:
-----BEGIN RSA PRIVATE KEY-----
ВаШсЕкРеТнЫйКлЮч

-----END RSA PRIVATE KEY-----
Without this key it is impossible to use the certificate, so keep it in a safe place.
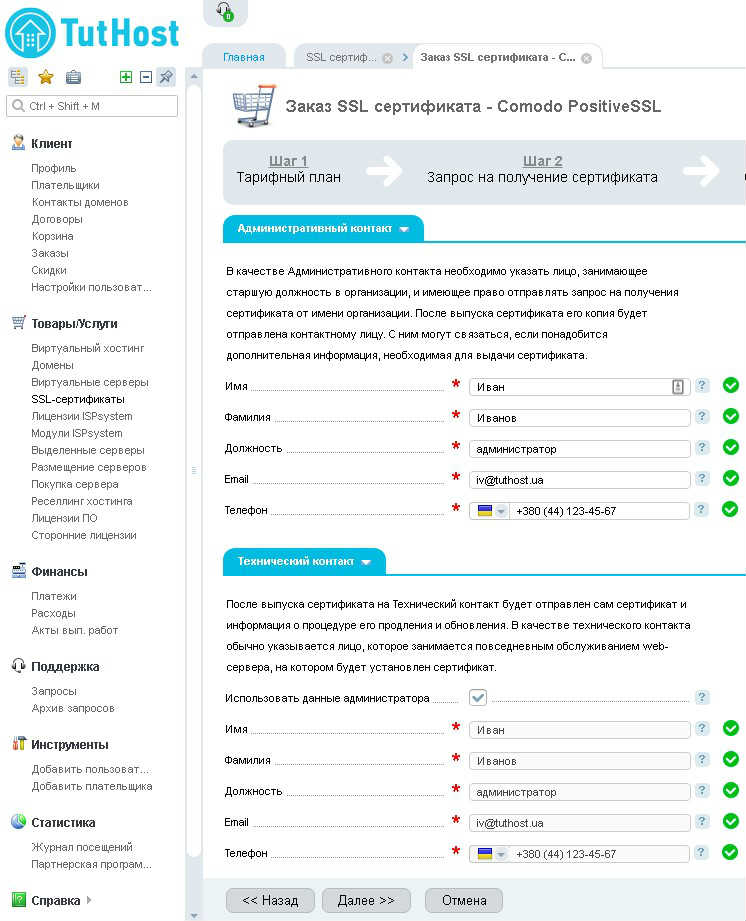
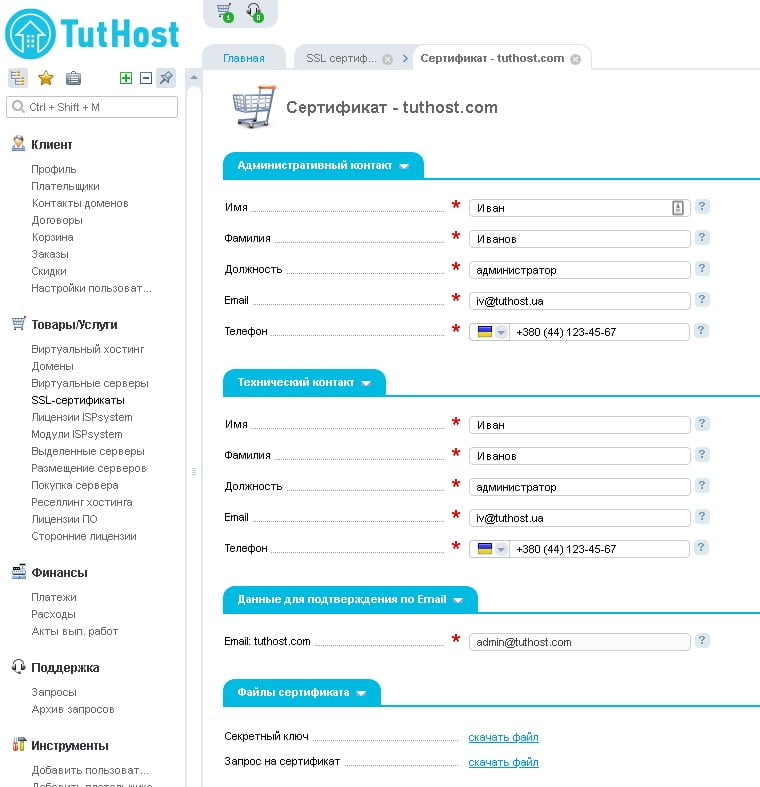
Click “Next”. The next step is to specify the contact information of the administrator and technician.
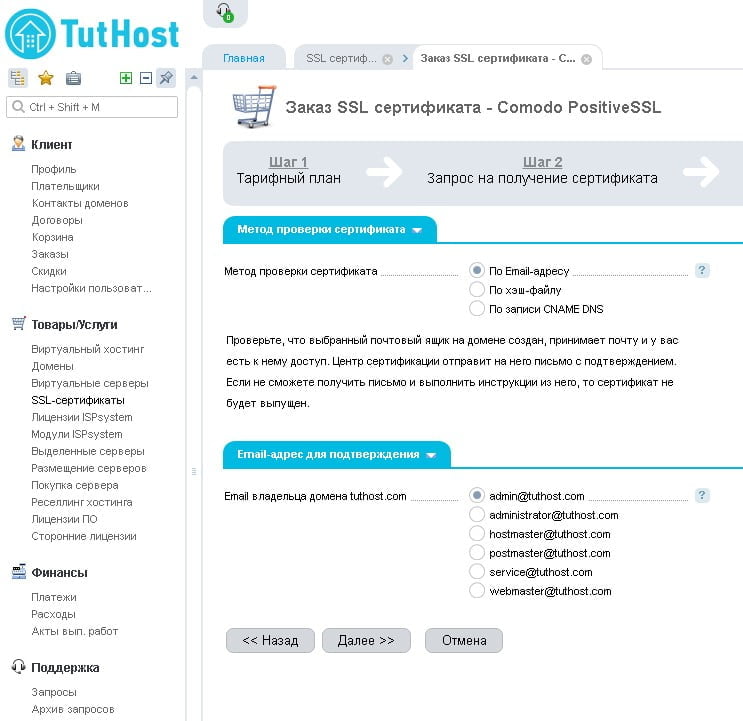
Press the “Next” button. In the next step, we choose how we want to test the domain. The fastest and easiest way by Email address. Also choose to which of the addresses we want to receive a verification letter.
Important! Only one of the five suggested addresses will be able to send a letter to the Certification Authority to verify the domain. The addresses must be in the domain for which the certificate is issued. Any other addresses will not work.
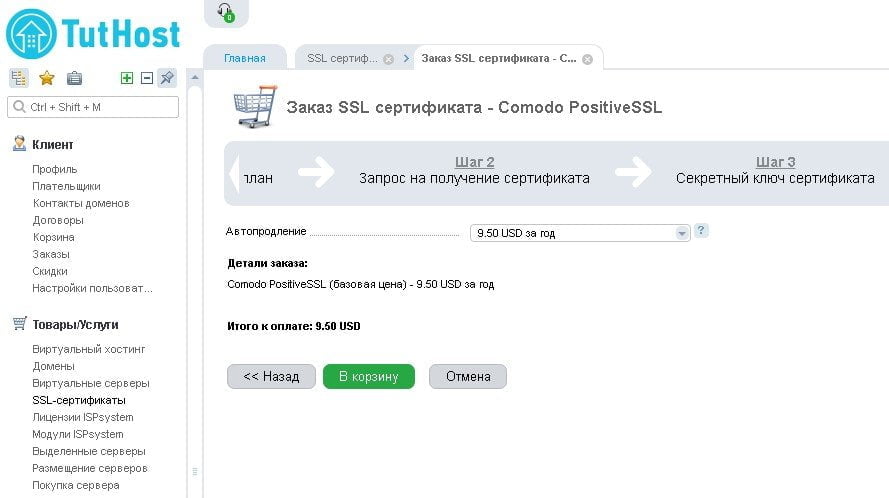
Click “Next”, we see the cost of our order and can choose for how long to enable automatic renewal of the certificate. Note, to renew the certificate, you will have to go through all the steps from creating a CSR request to installing the new certificate.
After clicking “Add to Cart” our order will be ready for payment.
To select a payment method press the green “Pay” button, choose a convenient method of payment and pay.
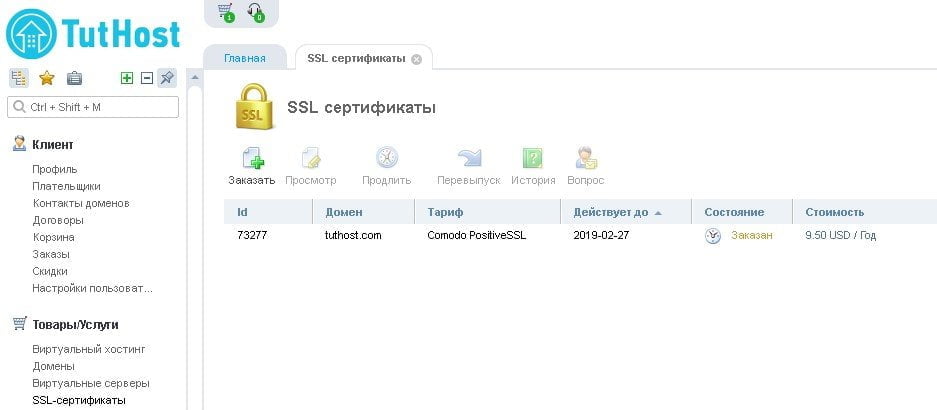
Checking the order. Go to “Products/Services” – “SSL certificates” and see our order.
If we have already paid for the order, then the Status column will show Active status. As long as the certificate has not been issued, the “Valid until” column displays the date of the order. As soon as the ssl certificate is issued, the value will change to the expiration date of the certificate.
If you double-click on the ordered certificate, you will see information about the certificate in the window that will open. At the very bottom, in the “Certificate Files” section, you can find and download the Secret Key and CSR request. After the certificate is issued, the certificate file will appear here, which can be downloaded and used. The certificate authority can also send the certificate files to you by email.
After receiving it, you can check the ssl certificate with our tools.
How to install an SSL certificate through ISPmanager
To use an ssl certificate, you need to install it on your site. Installing an SSL certificate through ISPmanager is easy. The following recommendations will help you install the certificate quickly.
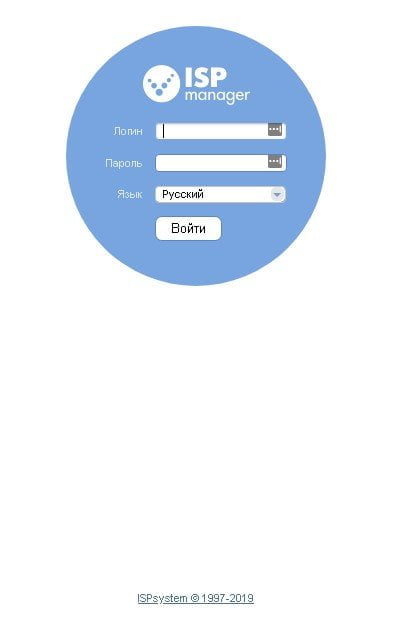
- Log in to ISPmanager with login and password of the user who owns the domain, and install ssl certificate. Login address: https://адрес_вашего_сервера_с_ISPменеджером.com:1500/ispmgr
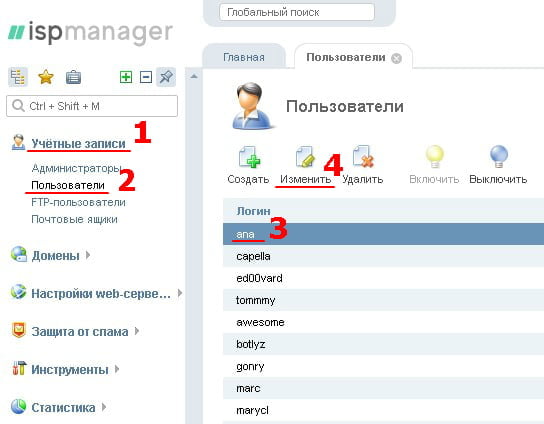
If you are logged in as root, make sure the user is allowed to use SSL, if not – change the settings. Go to “Accounts” – “Users” – select the user and click “Change”.
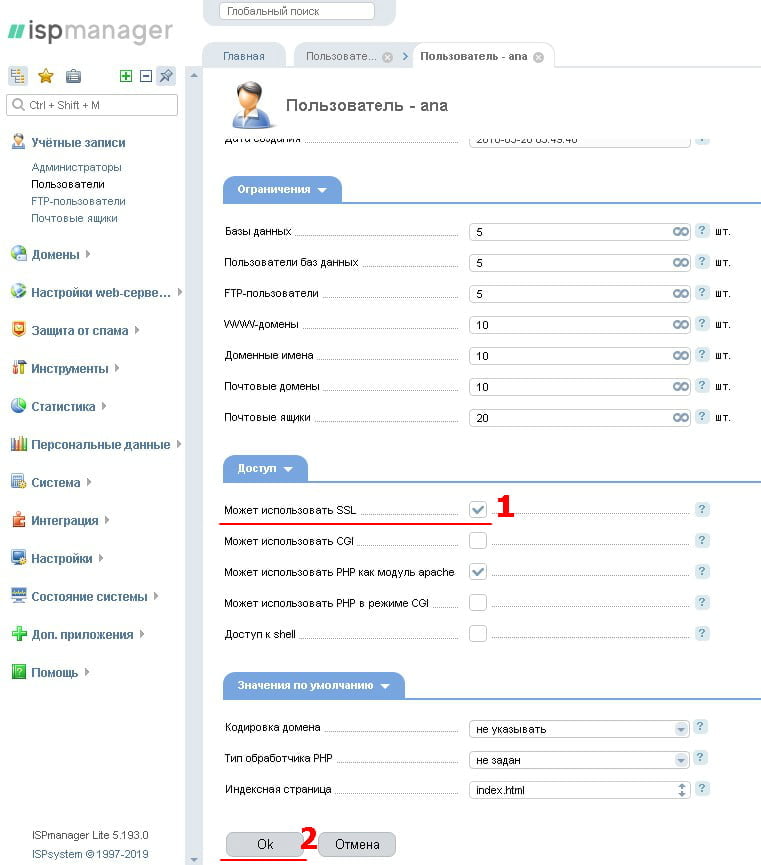
In the “Access” section, check the “Can use SSL” box. Press the “Ok” button.
Log in to ISPmanager as the user that is allowed to use SSL. Under root this is easily done by highlighting the user and clicking on the “Login” button.
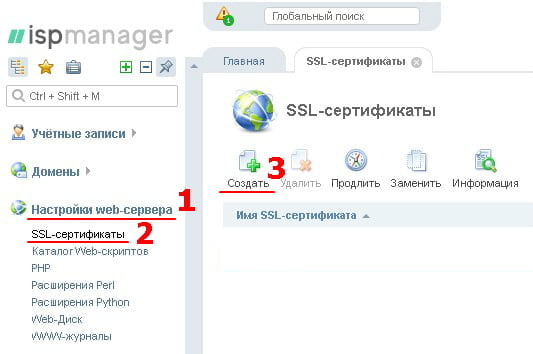
2. Installation. Go to “Web-server settings” – “SSL-certificates” and click “Create”.
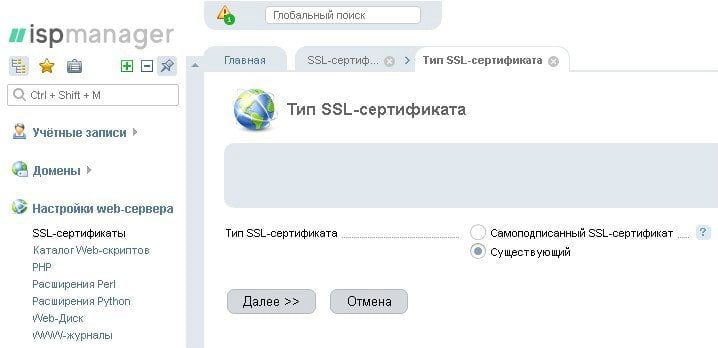
Select the ssl certificate type “Existing”. Press the “Next” button.
Insert the contents of the certificate, key and CA certificate files in the corresponding fields.
You can open certificate files with any text editor.
The contents of the certificate file looks something like this:
-BEGIN CERTIFICATE–
VaShsErTiFiCaT
-END CERTIFICATE–
The contents of the key file are as follows:
–BEGIN RSA PRIVATE KEY–
VaSHeKeKteKlUch
–END RSA PRIVATE KEY–
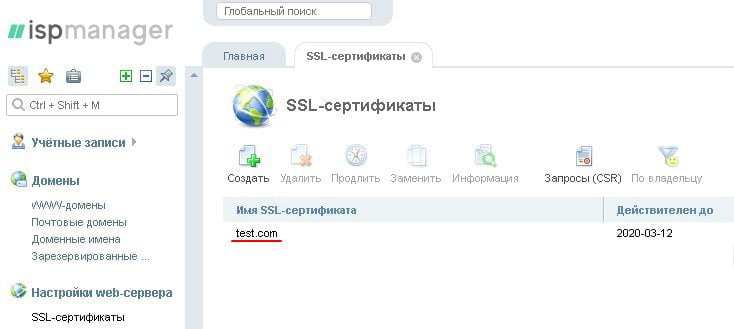
In the SSL certificate chain section, insert the root certificate and intermediate certificates sent by the certificate authority. Press the “Finish” button. You can see that the certificate has just been installed.
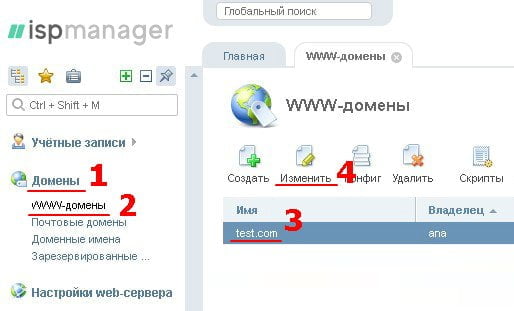
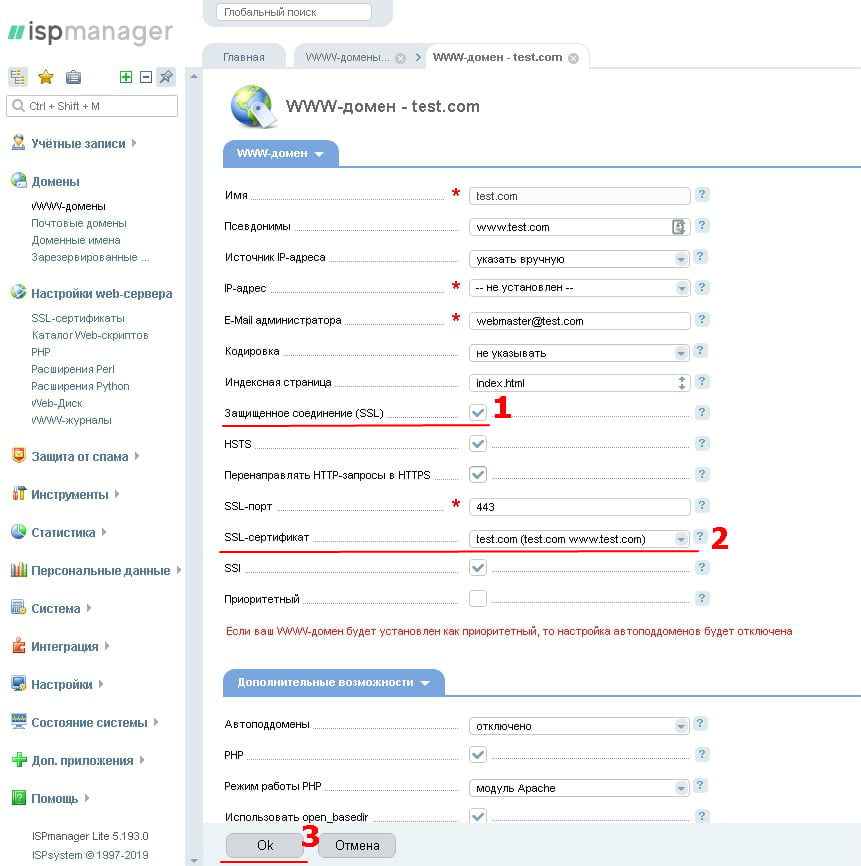
3. Include a certificate for the site. Open the section “Domains”, “WWW domains”, select our site, click on “Change”.
Turn on the Secure connection (SSL) and select our certificate in the “SSL certificate” field. Press the “Ok” button.
Installation is complete.
How to install an SSl certificate on Apache
If you need to install a ssl certificate on the Apache server – this tutorial will help you to do it easily.
- First, the certificate you received from the CA must be copied to your Apache server.
The ssl certificate and the key file are placed in the same directory, e.g. /etc/ssl/certificates/.
- Set up the certificate chain. But where to get this chain? You probably already have everything you need. Together with the certificate for your domain, you received “additional” root and intermediate certificates. There can be several intermediate certificates or just one. For Apache, you need to merge the certificate chain files into one file named vashdomen.ca-bundle. To prepare a chain file, open the certificates with a text editor and copy the contents of the files into a single text file. The order in which the contents of the certificates are placed is reversed: Intermediate 3, Intermediate 2, Intermediate 1, Root Certificate. It goes something like this:
—–BEGIN CERTIFICATE—–
ПрОмЕжУтОчНыЙсЕрТиФиКаТ3
—–END CERTIFICATE—–
—–BEGIN CERTIFICATE—–
ПрОмЕжУтОчНыЙсЕрТиФиКаТ2
—–END CERTIFICATE—–
—–BEGIN CERTIFICATE—–
ПрОмЕжУтОчНыЙсЕрТиФиКаТ1
—–END CERTIFICATE—–
—–BEGIN CERTIFICATE—–
КоРнЕвОйСеРтИфИкАт
—–END CERTIFICATE—–
Check that each following certificate must start on a new line.
The resulting file vashdomen.ca-bundle placed in the same directory in which you already have the key and certificate files for your domain.
- Next, you need to make changes to the Apache server configuration file. To do this, open the file “httpd.conf” in a text editor and in the block “Virtual Host” (Virtual Host) for your website add the following lines:
SSLEngine on

SSLCertificateFile /etc/ssl/sertificates/vashdomen.crt

SSLCertificateKeyFile /etc/ssl/sertificates/private.key

SSLCertificateChainFile /etc/ssl/sertificates/vashdomen.ca-bundle
Where:
SSLEngine on – enable SSL,
SSLCertificateFile /etc/ssl/sertificates/vashdomen.crt – specify the location of the certificate file for your domain,
SSLCertificateKeyFile /etc/ssl/sertificates/private.key – specify the location of the secret key file,
SSLCertificateChainFile /etc/ssl/sertificates/vashdomen.ca-bundle – specifies where the certificate authority chain file is located.
In case you are using Apache 1.x, replace “SSLCertificateChainFile” with “SSLCACertificateFile”. Then it will work out:
SSLCACertificateFile /etc/ssl/sertificates/vashdomen.ca-bundle
If you have different file locations or file names, then substitute your file names and the path to them.
- Save the “httpd.conf” file and restart Apache.
Installing an SSL certificate on Nginx
Installing SSL certificate on Nginx has its own peculiarities.
Our instructions will help you.
- Copy the files received from the Certification Authority to the server, for example to /etc/ssl/ and copy the key file “vashdomen.key” to the same folder.
- Next, the certificates must be merged into one file. Connect the certificate file “vashdomen.crt” with intermediate.crt (intermediate certificate) or with ca-bundle.crt (certificate chain). This can be done in different ways:
- using the cat command write into the file “vashdomen_bundle.crt” the contents of the files:cat root.crt intermediate.crt vashdomen.crt > vashdomen_bundle.crt
- editing the file: create the file “vashdomen_bundle.crt”, copy into it the contents of the certificate file “vashdomen.crt” and the contents of the intermediate and root certificates files. Make sure that each next certificate starts on a new line, like this:
—–BEGIN CERTIFICATE—–
ВаШсЕрТиФиКаТ
—–END CERTIFICATE—–
—–BEGIN CERTIFICATE—–
ПрОмЕжУтОчНыЙсЕрТиФиКаТ
—–END CERTIFICATE—–
—–BEGIN CERTIFICATE—–
КоРнЕвОйСеРтИфИкАт
—–END CERTIFICATE—–
- Making changes to the Nginx virtual host file.
Add the following lines to the Nginx virtual host file for your site:
ssl_certificate /etc/ssl/vashdomen_bundle.crt;
ssl_certificate_key /etc/ssl/vashdomen.key;
The resulting file should look something like this:
server {

listen 443;

ssl on;

ssl_certificate /etc/ssl/vashdomen_bundle.crt;

ssl_certificate_key /etc/ssl/vashdomen.key;

server_name vashdomen.com;

access_log /var/log/nginx/nginx.vhost.access.log;

error_log /var/log/nginx/nginx.vhost.error.log;

location / {

root /home/www/public_html/vashdomen.com/public/;

index index.html;

}
What if you want your site to work with both secure connection via https protocol and unprotected via http? Then you need to make a copy of the existing server module for the unsecured connection and insert it below the module you want to change to work with SSL before you make the changes. For the changes to take effect, you need to restart Nginx, to do this run the command: sudo /etc/init.d/nginx restart
That’s it, the installation on Nginx is complete.
Installing an SSL certificate in Directadmin
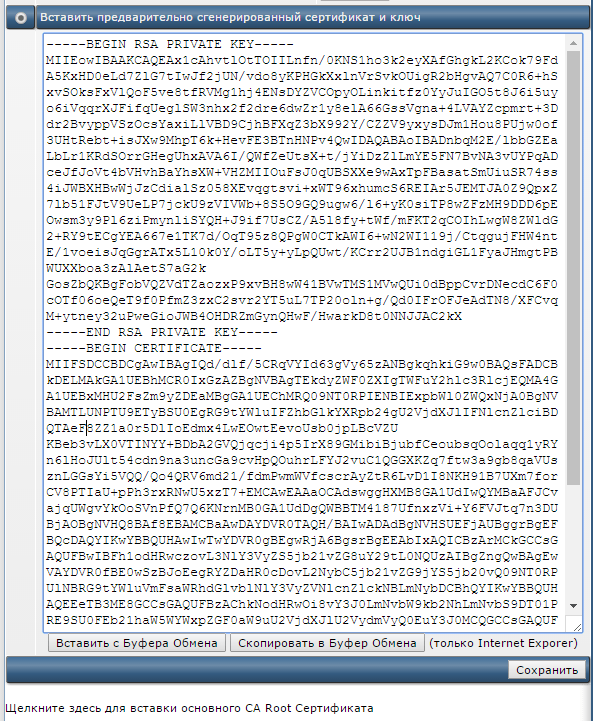
- Go to the Directadmin web hosting control panel at https://vashdomen.com:2222 and click the “SSL certificates” link in the advanced options.
- In the form that opens, select “Insert pre-generated certificate and key”.
Insert the contents of the private key and the certificate in turn. Should turn out as in the picture and press the “Save” button.
- Next, install the intermediate certificates.
Click on the link below the form: “Click here to insert the main CA Root Certificate”.
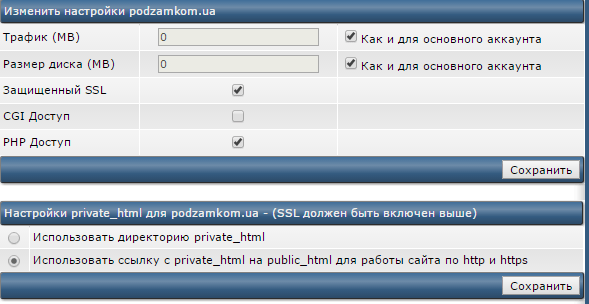
In the form that opens, insert the intermediate certificate that you received from the CA and check the “Use CA certificate” checkbox. - Enable SSL for our domain. In the control panel, click on the menu item “Domain Settings” and select our domain.
Check the SSL checkbox.
We recommend selecting in the settings below: “Use link from private_html to public_html for http and https operation of the site”. So our site will be available both via http and https protocols.
Verify that the SSL certificate is installed correctly
After we have installed the ssl certificate, we need to check that it is installed correctly. You can do this with the SSL certificate validation tool:
- Open the link https://tuthost.ua/ssl/ssl-checker/
- In the Server Host (domain) field specify your domain and click “Verify”.
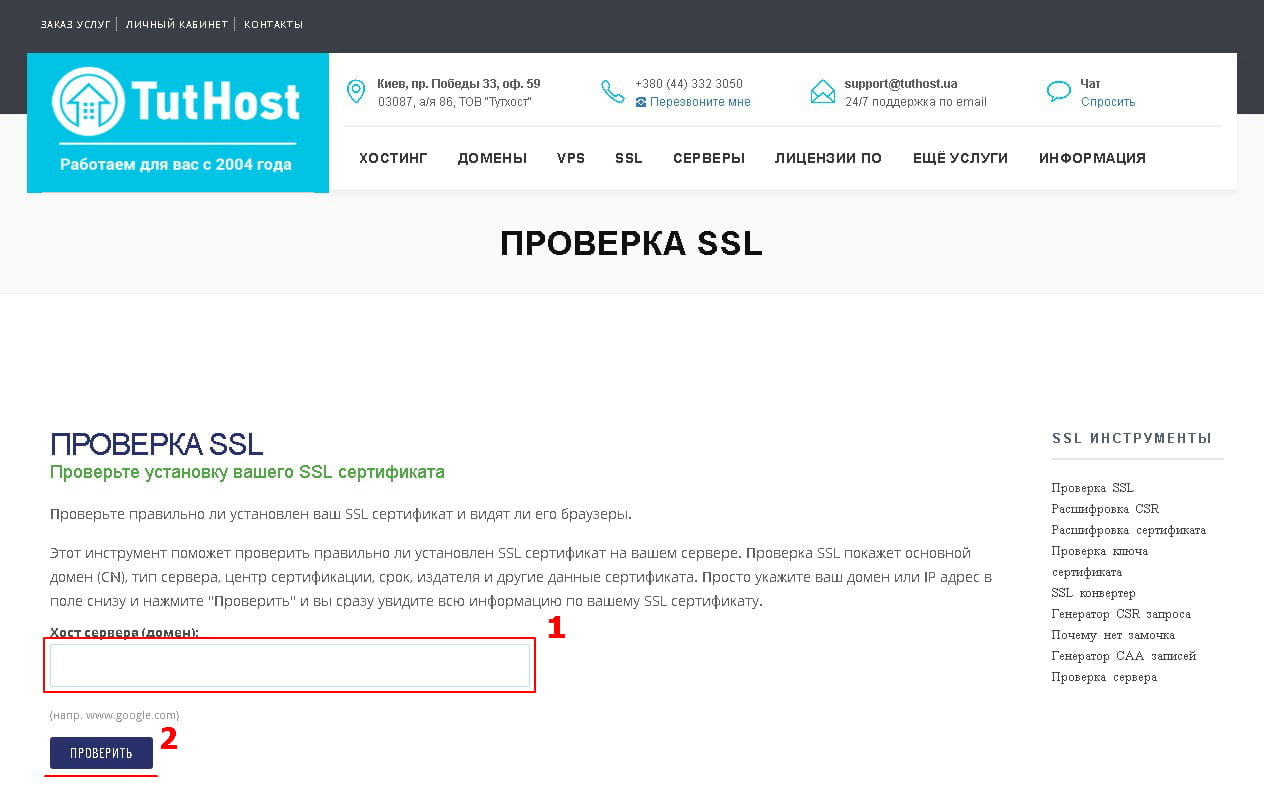
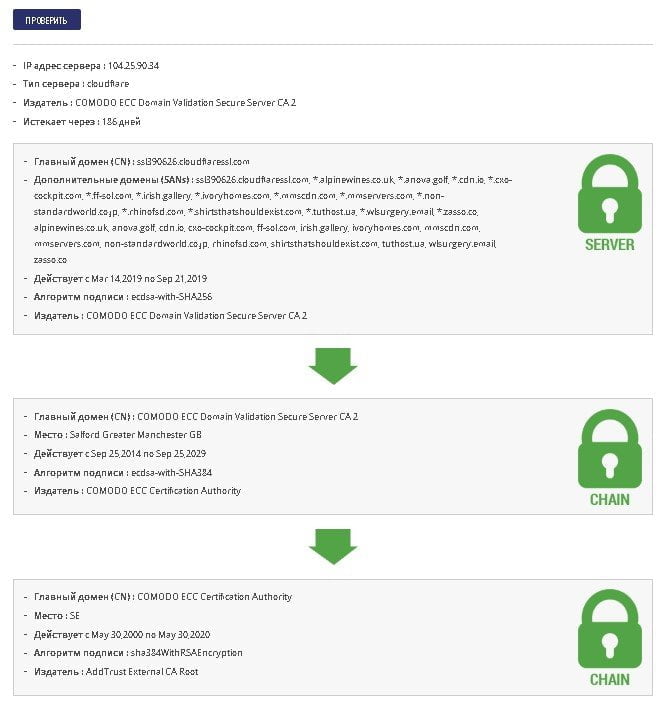
- If your ssl certificate is installed correctly, you will see about this result:
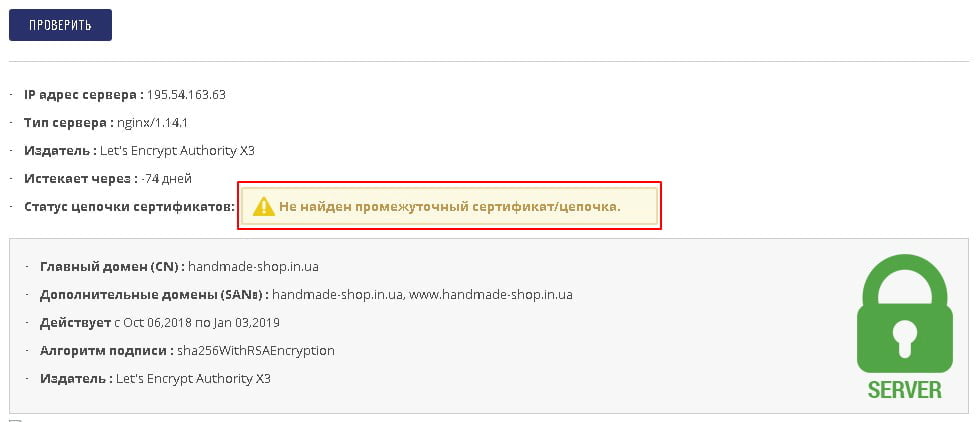
IMPORTANT!!! If this check generates any warnings, such as this one:
So the certificate is not installed correctly, please contact our support team and we will help you to resolve this issue.

