How to move the site to another hosting
- Key points when migrating a site to another hosting
- Choose a new hosting and a suitable tariff
- Creating a backup copy of the site files and database
- Uploading site files and database to new hosting
- Plugins to migrate Wordpress to other hosting
- Plugins to transfer Joomla to another hosting
- Configuring the CMS
- Checking the correctness of the move
- Changing NS servers
Often our customers ask our support team how to properly transfer the site to our hosting. In most situations, the support team is free to help you make this transfer. And for those who want to do the transfer themselves, we have prepared a step-by-step guide.
The transfer will be considered on the example of the most popular CMS: Wordpress and also Joomla. For other systems, the porting principle will be very similar, so it makes sense to break down the porting of these particular systems in detail.
Key points when migrating a site to another hosting
Transferring a site to another domain – a process that may seem complicated for beginners, but in fact it is quite a simple task that can be accomplished in a few minutes. Here are the basic steps for moving a WordPress site to another domain or from a local server to hosting.
The entire transfer can be divided into several stages:
- Migration of site files. To do this, you must have access to files via FTP or an archive with a backup of the entire site.
- Database migration. Import and export the database can be done with the utility phpMyAdmin, which is available on all web hosting.
- Edit the configs and settings of the site. After the transfer may change the paths to the files and site address, we will consider in detail where you need to make changes.
- Checking the correct operation of the functional part of the site and design.

The most common mistakes made when transferring the site:
- Do not check if the new hosting meets the system requirements of your site
- Do not fix file paths in the CMS configuration
- Not correctly migrating the database
Step 1. Create a backup copy of your site
Before you start the migration process, you need to back up your site. This will help avoid data loss if something goes wrong during the transfer. There are many plugins that can help back up your site, such as UpdraftPlus, BackupBuddy or Jetpack.
Step 2. Install WordPress on a new domain or hosting
If you want to move your WordPress site to another domain, you must install WordPress on the new domain. If you want to move the site from a local server to hosting, you also need to install WordPress on hosting. Many hosting providers provide a WordPress installer in their control panel that allows you to install WordPress in just a few clicks.
Step 3. Move your site files
The next step is to transfer your site files to a new domain or hosting. To do this, you need to use an FTP-client, such as FileZilla. You need to connect to the server where your site is located and upload all the files to the new domain or hosting.
Step 4. Export and import the database
The next step is to export the database of your site using phpMyAdmin or any other database tool. The exported database file must be imported to a new domain or hosting. To import the database, you can use the same phpMyAdmin or other tools for working with databases.
Step 5. Change the settings for your site
After the transfer of files and databases, you need to change the settings of your site to make it work on the new domain or hosting. To do this, you can use the Velvet Blues Update URLs plugin or manually change the URLs in the database.
Step 6. Check your website
After completing the transfer of your site to a new domain or hosting should check its work. Go through all the pages of your site, make sure they are displayed correctly, and that all functions work as intended. If you encounter any problems, try to find a solution online or ask for help from professional web developers.
Transferring a site to another domain or from a local server to hosting may seem like a complicated process, but if you follow the steps above, you’ll be able to move your WordPress site without too much trouble. Remember, backing up your site before migrating is an extremely important step that will help you avoid losing data and time if something goes wrong.
We will try to detail all the steps so that you avoid these mistakes.
Free site transfer to Tuthost
We have a service for free transfer of the site. During the transfer of the site with the help of our specialists will perform the following steps:
- Analysis of your current site and its requirements
- Selecting a rate plan
- Migration of all site files to new hosting
- Transfer site database export and import to us
- Checking the correct operation of the site after the transfer
- Domain transfer, change of nemservers
Choose a new hosting and a suitable tariff
To choose a suitable tariff for the transfer of your site – pay attention to the following parameters:
- How much space does your site take on the old hosting
- What version of PHP and MySQL is used by the site. It happens that you use a very old version, which may no longer be supported on the new hosting or vice versa use the latest version, which is not yet available. At our hosting service we allow you to choose the version of PHP from the rather old 5.2 to the latest 7.3, which is available at the time of writing this article.
- How much RAM is needed for stable operation of the site. Not all hosts provide this information, but many have such restrictions in their tariff plans. We recommend to clarify this with your hoster, especially if the site has a large attendance. This information can also be displayed in the control panel hosting schedules created by the site.
If your site is built using the popular CMS Joomla or Wordpress, we have hosting plans optimized specifically for these systems. Pay attention to hosting for Wordpress and hosting for Joomla.
Creating a backup copy of the site files and database
Once you have decided on a hosting plan, you can proceed directly to the transfer of the site.
You should start by creating a backup of the files, this can be done in several ways:
- Download all the files from the site via FTP to your computer and compress them into a zip archive if you have windows or tar.gz if you work on Linux. Usually the site files are stored by the hoster in the public_html or www folders
- It can be much more convenient to create a backup copy of the site files directly in the control panel hosting. In Cpanel there are two options for this: Backup and Backup Wizard, in ISPmanager you go to Backup, and in Directadmin under Backups select items to add to the backup and click “Backup”.
- If the hoster does not have an option in the panel to manage backups – look for a file manager.
- For advanced users, the easiest way to make an archive with files can be ssh and the tar command with the compression parameter -czf.
You must also create a backup copy of the database, in some cases it can be included in the archive along with the files, but if this is not possible, then the most convenient way to export the database – this is phpMyAdmin, a utility that has become standard for working with databases and is on most web hosting.
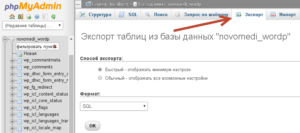
To export via phpMyAdmin perform the following steps:
- Go to phpMyAdmin and select the desired database
- Click on the Export option, by default you can leave the export method – fast
- Select SQL format and click OK and save the proposed file.
- If you have a large database, more than 100 mb, you can choose the usual export method and select zip or gzip compression in the options.

Uploading site files and database to new hosting
Once the backup files and database created, move on to upload them to the new hosting. On our hosting is a free test period of 10 days, so you can do the transfer of the site and make sure it works correctly even before you pay for hosting services.
You can download site files in several ways:
- By FTP, we recommend using the popular free FTP client Filezilla, as well as the file managers FAR, mc, Total Commander.
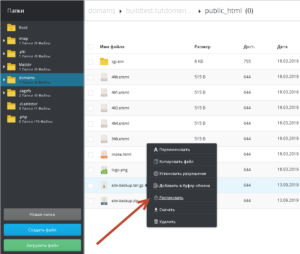
- Through the file manager in Directadmin, if your files are packed in a ZIP or tar.gz archive, you can unpack the archive directly in the file manager, to do this right-click on it and select the unpack menu item.

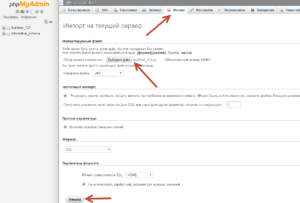
The easiest way to load the database is through phpMyAdmin:
- Select the desired database and click import,
- Select the file with a backup of the database and specify the encoding of the file, the same as used on the previous hosting, in most cases it is utf-8. The database file itself can be in .sql format or in zip or gzip (tar.gz)

You can also download a database backup through the control panel in Directadmin under Manage MySQL – Download backup, select a file with a backup of the database, choose which database to unpack the archive and specify the user name and password for connecting to the database.
Plugins to migrate Wordpress to other hosting
In case you need to move your WordPress site to another hosting service, then the whole process of transfer can greatly simplify the use of special plugins for the migration of the site. Here are the plugins we’ve tested and recommended for use:
- WordPress Duplicator – One of the most popular plugins for transferring in the directory of Wordpress plugins. More than 1 million downloads and a 5-star rating for a reason. The plugin can not only transfer sites, but also make backups of them. In most cases, the free version will be enough for you. But there is also a paid Pro version, which allows you to make scheduled backups, save them to cloud storage and migrate multisites.
- Migrate Guru. – plugin was created in 2017, but very quickly gained popularity and is now considered one of the fastest and easiest ways to transfer a Wordpress site. The plugin is completely free and allows you to migrate sites up to 200 Gb. It has no backup option, but it does its main task perfectly.
- All-in-One WP Migration – and it is the most popular plugin by the number of downloads, more than 2 million. In addition to the basic transfer function, it also has a search and replace in the database, which may come in handy if you also change the address of the site when transferring the site. The plugin has a mobile interface, so that you can even manage the transfer of the site from your smartphone.
Plugins to transfer Joomla to another hosting
One of the most common solutions for transferring Joomla between hostings is the Akeeba Backup extension. This is a handy tool for backing up and restoring to a new location.
You can also migrate directly to a new location without having to download and upload a backup copy to your PC (available in the commercial version).
Configuring the CMS
Connection settings to the database MySQL, as well as paths to the files in the CMS Joomla are in the file configuration.php, which you can find in the root folder of CMS.
The database connection parameters are in the following variables:public $host = 'localhost';
public $user = 'user_db';
public $db = 'base_db';
public $password = 'pass123';
Here you need to specify the parameters of the new database, where you are migrating the site.
And there are two path variables for the temporary files and the log folder.public $log_path = '/path/to/logs';
public $tmp_path = '/path/to/tmp';
On our hosting the path to the domain folder is as follows: /home/имя_пользователя/domains/имя_домена/public_html
For example, if you have a login tuthostuser and domain user.tutdomen.com, the paths to the logs and temporary files will look like this public $log_path = '/home/tuthostuser/domains/user.tutdomen.com/public_html/logs';
public $tmp_path = '/home/tuthostuser/domains/user.tutdomen.com/public_html/tmp';
The settings for connecting to the MySQL database in the CMS Wordpress are in the file wp-config.php, which you can find in the root folder of the CMS.
The database connection parameters are in the following variables:define( 'DB_NAME', 'user_db' );
define( 'DB_USER', 'base_db' );
define( 'DB_PASSWORD', 'pass123' );
define( 'DB_HOST', 'localhost' );
Checking the correctness of the move
Check the correctness of the transfer of your site to a new hosting, you can by making changes to the hosts file on your home computer.
Depending on the operating system, this file may be located in different paths.
In Windows OS, provided windows is installed on the c:\ drive and in the windows folder, this file is located at:c:\windows\system32\drivers\etc\hosts
On Linux/etc/hosts
In the hosts file, the entry is as follows: “ip-address” followed by a space “name-domain”,
You need to make the main 2 entries is the domain itself and a subdomain www, if you have a site address is configured with the prefix www. For example you have a domain name user.tutdomen.com and IP address for the site 192.168.0.10 then you need to make the following entries.192.168.0.10 user.tutdomen.com
192.168.0.10 www.user.tutdomen.com
Changing NS servers
If the test site errors are not detected and the site loads correctly, then you can proceed to change the NS servers or DNS records, depending on which method you use. But as a rule, it is better to specify the NS server hosting.
Our hosting uses NS servers:
ns1.tuthost.com
ns2.tuthost.com
ns3.tuthost.com
ns4.tuthost.com
You can change nameservers for a domain in the domain control panel at your domain registrar. If you forget who registered your domain, then find out your registrar is easy through the service verification of domains, the name of the registrar company will be listed in the registrar or registrator.
You can also transfer a domain to us for service – get a user-friendly domain and DNS control panel and a guaranteed best price for domain renewal.
We hope that in this article, we were able to fully answer the question: “How to transfer a site from one hosting to another”, and if you still have questions – our support team will be happy to advise you.
Savings of 20% and domain as a gift when you pay for a year
| Plus 4.00 $ /mon. | Business 6.00 $ /mon. | Large 8.00 $ /mon. | |
|---|---|---|---|
| Space on SSD drive | 3 GB | 10 GB | 20 GB |
| Sites on the account | 5 | 15 | 30 |
| MySQL databases | Unlimited | Unlimited | Unlimited |
| RAM limit | 256 MB | 512 MB | 1024 MB |
| Processor limit | 1600 Mhz | 2200 Mhz | 3000 Mhz |
| PHP 5.2 – 8.0 | |||
| Python 2.7 – 3.8 | |||
| Domain for free | |||
| SSL Certificate Free | |||
| Site builder and 200 templates | |||
| Installatron script installer | |||
| Hosting location (optional) | |||
| Free test period | Test of 10 days | Test of 10 days | Test of 10 days |


