Subdomains
This article will give you an introduction to working with subdomains. It includes the following information: creation of subdomains, removal of subdomains, subdomain statistics, usage logs, error logs and creation of FTP-users for individual subdomains.
Creating subdomains

 To create a subdomain, log in to the Control Panel and click the Accounts icon, then the Subdomain Setup link.
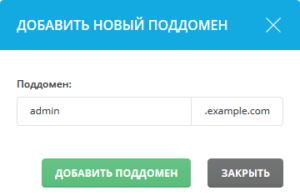
 To create a subdomain, click the “Add subdomain” button.
In the above example we create admin.example.com. enter the desired name and click “Add subdomain” again.
You can also create a subdomain within a subdomain – sub.sub.example.com.
Note: A new subdomain can take up to five minutes to activate.
Uploading to a subdomain
Each subdomain appears in public_html/subdomain-name. This means that your subdomain can also be accessed at http://www.yoursite.com/subdomain-name. You can upload files to the subdomain folder just like you would upload to any other folder: using FTP, FileZilla, File Manager, etc. More information about uploading files to your site can be found here.
Removing subdomains
To delete a subdomain, check the box next to the subdomains you want to delete and click the “Delete” button.
Then check “Delete directory contents” if you want to delete the subdomain directory and its files.
If you do not check the box, the subdomain will stop working, but the files and directory will remain intact.
Subdomain statistics
Next to each subdomain name is a link “Statistics” – click on the + sign next to the subdomain and the menu with this item will pop up.
This link will download Webalizer statistics. Note that for the link to work:
– the subdomain must have some traffic (at least one visit)
– the subdomain must be more than one day old
As long as these requirements are not met, the “Statistics” link will return a “file not found” error.
Use Logs/Error Logs
The “Usage Logs” and “Error Logs” links (see Figure above) will take you to a text version of each log file. The usage logs contain the IP address of the requesting party, the time and date of the request, and a description of the request. The “Statistics” link (see Section “Subdomain Statistics”) is a graphical version of the usage logs. The error log provides information about failed requests and is useful for troubleshooting when the cause of the error is unknown.
Usage and error logs are available as soon as subdomains are created. You will see an empty field if the subdomains have had no activity.
Creating FTP users for individual subdomains
To limit an FTP account to a single subdomain, follow these steps:
1.Create a subdomain, if you have not already done so.
2. In the main menu of the control panel under “Accounts” (see “Accounts”). Create subdomains” section ) click the “Manage FTP” link.
3.Click the “Create FTP account” button.
 In the “FTP User Name” field, enter the name of the subdomain (without .yourdomain.com).
Enter the password in the password field (it is recommended to use a randomly generated password).
Select the “User” radio button.
Click the “Create” button below.
Note. More information about FTP accounts can be found here.


