FTP Accounts
This section describes how to create, modify and delete FTP accounts.
Creating FTP accounts

 To create an FTP account, log in to the Control Panel and click the Account Manager icon and then the “Manage FTP” link.
You will see a list of current FTP accounts that looks something like this:
Default FTP account
The default FTP account and the control panel account have the same username and password. You cannot remove the default FTP account, but you can make its password different from the control panel password.
Note. If you change the control panel password, you can choose whether you want to make it the same as your main FTP account and/or from the main database account. Select the checkboxes below the password fields:
Creating a new account
Click the “Create FTP Account” link. You will see a screen that looks like this:
First, select the FTP username. In the above example we chose “user”. Next, enter your password. Then select the access level of the FTP account.
Domain: This FTP user has access to public_html, private_html, mail, domains and backup directories.
FTP: this FTP user can only access the public_ftp directory.
User: This FTP user has access only to public_html/username/. If we chose this option in the image above, the FTP user would only have access to public_html/user/ or http://www.example.com/user/. (If a subdomain named user.example.com exists, that FTP user would also have access to it.
If the directory does not already exist, it will be created.
When finished, click the “Create” button.
After clicking the “Create” button
After you click “Create”, the control panel will notify you that you have successfully created an FTP account and redirect you to the FTP Accounts page. You may notice that your FTP username has @yourdomain.com after it. This is because your domain uses a shared IP address. If your website has its own dedicated (static) IP address, your FTP username will not contain the @yourdomain.com prefix.
If you have a dedicated IP address and you create additional domains for that account, those additional domains will have FTP login names username@thatdomain.com.
Uploading from FTP
Step 1: Download the FTP client.
Uploading to the server via FTP requires special software. Most computer systems do not come with FTP clients, so you will have to download them from the Internet. We recommend FileZilla
Step 2: Connect to the server.
If you use FileZilla, the information should look like this:
 All FTP clients need the following information:
User name (this is your user name in the control panel).
Password (This is your control panel password.)
Address (This is the server address. Use ftp.yourdomain.com)
Port (Use default port 21)
Step 3: Open the public_html directory and upload your files.
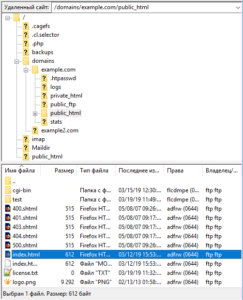
Once connected, you can see your folders on the right side. You can click on the desired folder to see its contents. If you have multiple domains hosted in your account, you must first go into the /domains directory, then the domain you want to edit, then the public_html directory.
To download, select the files/folders on your computer and drag them to the appropriate directory on the remote server. Each FTP client works differently, so please refer to its help file for complete instructions.
Modifying and deleting FTP accounts
Changing accounts
The FTP main menu lists all FTP accounts. Click on the desired account to change it. You can change the password, and that password can be your old password or your new password. You can also change the account access level (see above).
Note. If you change the control panel password, you can choose whether you want to make it the same as your main FTP account and/or your main database account password. You can simply set the desired fields under the password fields:
Deleting accounts
To delete an account, check the box next to the one you want to delete, and then click “Delete” as shown here:
Note. The FTP directory itself will not be deleted unless it is empty.
Creating FTP users for individual subdomains
To limit an FTP account to a single subdomain, follow these steps:
1.Create a subdomain, if you have not already done so.
2. In the main menu of the control panel under “Accounts” (see “Accounts”). Create FTP Accounts) click the “Manage FTP” link.
3.Click the “Create FTP account” button.
 4.In the “FTP User Name” field, enter the name of the subdomain (without .yourdomain.com).
5.Enter the password in the password field (it is recommended to use a randomly generated password).
6.Select the “User” switch.
7.Click the “Create” button below.


